Example: Using the Connector in SQL Workbench
SQL Workbench is one of many applications that use connectors to query and view data. The instructions below provide general guidelines for configuring and using the Simba Amazon Athena JDBC Connector in SQL Workbench.
The following topics are discussed here:
- Configuring SQL Workbench to Use the Connector
- Querying Data with SQL Workbench
- Exploring Data with SQL Workbench
Before You Begin
Before you can use the connector in SQL Workbench, you must do the following:
- Download and install SQL Workbench. You can download the application from http://www.sql-workbench.net/downloads.html.
- Download and extract the connector ZIP archive (
SimbaAthenaJDBC-[Version].zip) into the SQL Workbench directory. - Set up the Athena service. For more information, see "Setting Up" in the Amazon Athena Documentation: http://docs.aws.amazon.com/athena/latest/ug/setting-up.html.
Configuring SQL Workbench to Use the Connector
Add the Simba Amazon Athena JDBC Connector to the list of connectors in SQL Workbench, and then create a connection profile that contains the necessary connection information.
To configure SQL Workbench to use the connector:
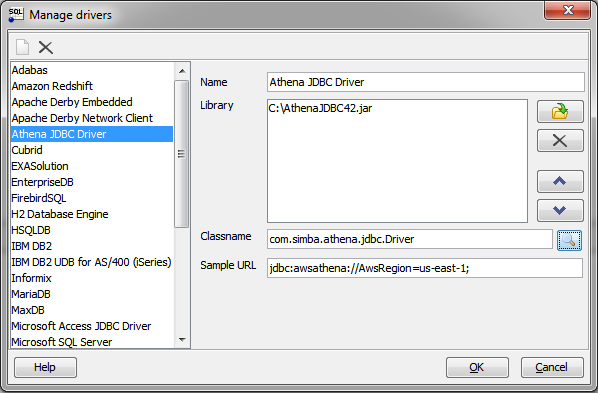
- In SQL Workbench, select File > Manage Drivers.
- In the Manage Drivers dialog box, specify the following values in the fields:
- Click OK to save your settings and close the Manage Drivers dialog box.
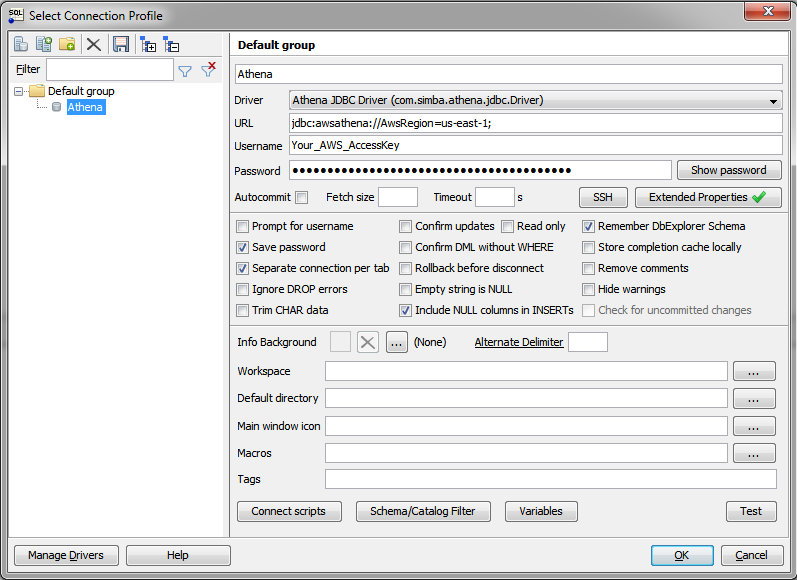
- Click File > Connect Window.
- In the Select Connection Profile dialog box, create a new connection profile named "Athena".
- From the Driver drop-down list, select the connector that you configured in step 2. The connector is listed with the name that you specified in step 2, followed by the classname.
- To specify required connection information, specify the following values in the fields:
- Click Extended Properties, and add a property named
S3OutputLocation. Set the value of this property to the path of the Amazon S3 location where you want to store query results, prefixed bys3://. - Click OK to save your settings and close the Edit Extended Properties dialog box.
- Click OK to save your connection profile and close the Select Connection Profile dialog box.
| Field Name | Value |
|---|---|
|
Name |
A name that you want to use to identify the Simba Amazon Athena JDBC Connector in SQL Workbench. For example, Athena JDBC Connector. |
|
Library |
The full path and name of the For example, AthenaJDBC42.jar for the connector that supports JDBC 4.2. |
|
Classname |
com.simba.athena.jdbc.Driver |
|
Sample URL |
A connection URL that only specifies the AWS region of the Athena instance that you want to connect to, using the format For example, jdbc:awsathena://AwsRegion=us-east-1;. |

| Field Name | Value |
|---|---|
|
URL |
A connection URL that only specifies the AWS region of the Athena instance that you want to connect to, using the format For example, jdbc:awsathena://AwsRegion=us-east-1;. By default, this field is automatically populated with the Sample URL value that you specified for the selected connector. |
|
Username |
The access key provided by your AWS account. |
|
Password |
The secret key provided by your AWS account. |

For example, to store Athena query results in a folder named "test-folder-1" inside an S3 bucket named "query-results-bucket", you would set the S3OutputLocation property to s3://query-results-bucket/test-folder-1.
You can now use the Simba Amazon Athena JDBC Connector in SQL Workbench to query and view data.
Querying Data with SQL Workbench
Use the Statement window in SQL Workbench to execute queries on your data. You can also execute CREATE statements to add new tables, and create and use custom databases.
Note: By default, the connector queries the default database. To distinguish between tables in the default and custom databases, when writing your queries, use the database identifier as a namespace prefix to your table name.
To query data with SQL Workbench:
- In the Statement window, type a query that creates a table in the default database. For example:
- Click Execute.
- Run a simple query to retrieve some data, and then view the results. For example:
CREATE EXTERNAL TABLE IF NOT EXISTS integer_table (
KeyColumn STRING,
Column1 INT)
ROW FORMAT SERDE 'org.apache.hadoop.hive.serde2.lazy.LazySimpleSerDe'
WITH SERDEPROPERTIES ('serialization.format' = ',', 'field.delim' = ',')
LOCATION 's3://athena-examples/integer_table/'
SELECT * FROM integer_table
You can now view details about the retrieved data in the Data Explorer tab, as described below.
Exploring Data with SQL Workbench
Use the Data Explorer tab to view details about your retrieved data.
To explore data with SQL Workbench:
- Select the Data Explorer tab, and then select the default schema (or database).
- Select the integer_table table. SQL Workbench loads the Columns tab, which shows the table schema.
- Select the other tabs to view more information about the integer_table table. For example:
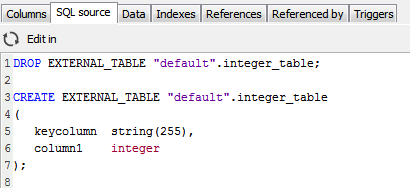
- Select the SQL Source tab to view the queries that were used to generate the table.
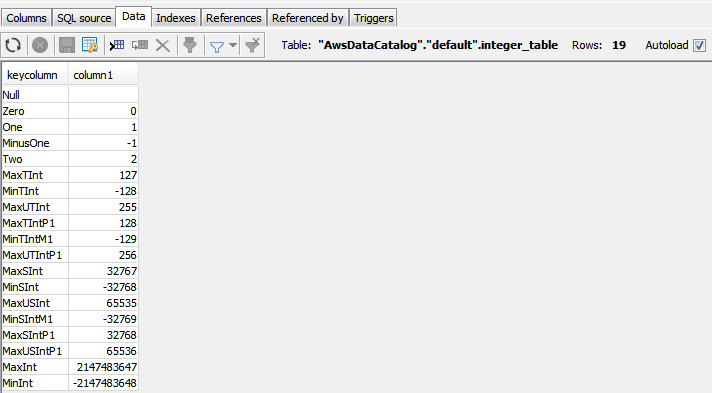
- Select the Data tab to view a list of the rows returned from the table.


You can repeat the procedures described above to retrieve and explore different data using the Simba Amazon Athena JDBC Connector in SQL Workbench.