Web Report Studio Profile Properties
This topic describes how you can use the Web Report Studio Profile dialog box to create profiles to apply in Web Report Studio.
Server displays the dialog box when an administrator selects New Profile in the Administration > Server Profile > Customize Profile > Web Report Studio tab on the Server Console.
This topic contains the following sections:
You see these elements on all the tabs:
Web Report Studio Profile Name
Specify the name for the new profile.
Description
Specify information about the new profile.
OK
Select to create the profile and close the dialog box.
Cancel
Select to close the dialog box without creating a profile.
Select All
Select if you want to select all the features in the dialog box.
Select None
Select if you want to clear all the features in the dialog box.
Help
Select to view information about the dialog box.
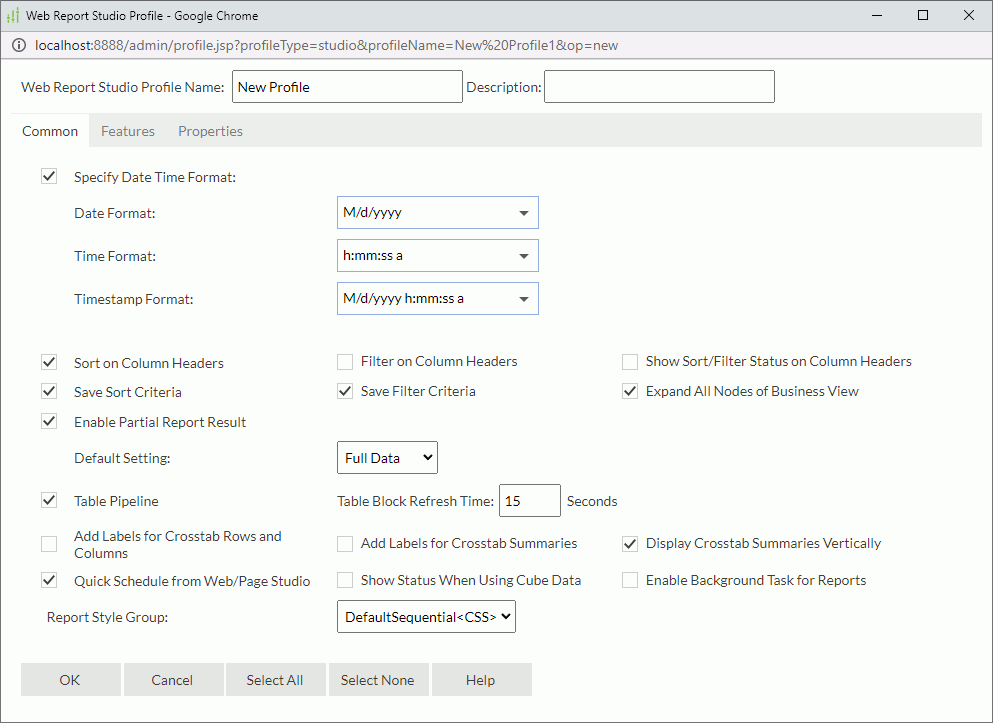
Common Tab Properties
Specify the properties for Web Report Studio. Page Report Studio and JDashboard also have these properties. For more information, see Common Tab Properties.

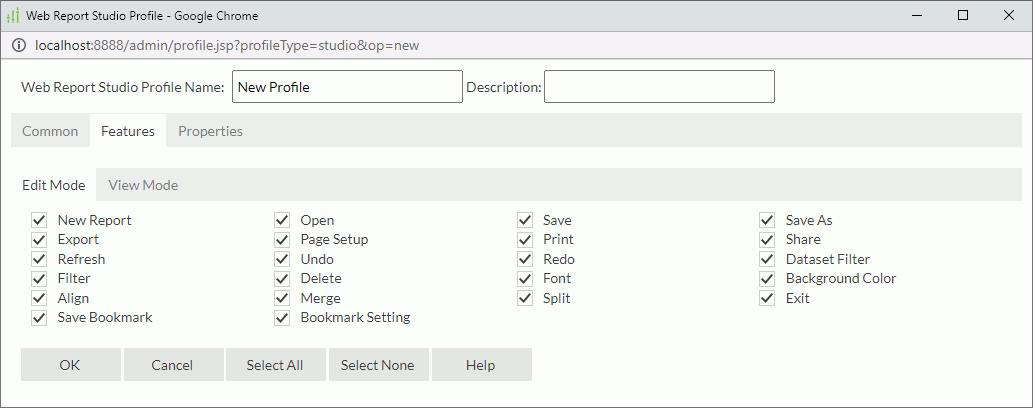
Features Tab Properties
Specify the features you want to use in Web Report Studio.
Edit Mode Properties
Turn on/off the Web Report Studio edit mode features for the profile.

New Report
Select if you want to create new web reports based on an existing business view.
Open
Select if you want to open web reports.
Save
Select if you want to save changes to web reports.
Save As
Select if you want to save copies of web reports or web report page templates.
Export
Select if you want to export reports to disk or version in various formats.
Page Setup
Select if you want to configure report page settings.
Select if you want to print web reports.
Share
Select if you want to share your web reports to a public folder in the server resource tree so that other users can also work on them.
Refresh
Select if you want to reload report data.
Undo
Select if you want to undo previous operations.
Redo
Select if you want to reverse the operation of Undo.
Dataset Filter
Select if you want to apply filters to datasets that specified data components use to narrow down data scope.
Filter
Select if you want to filter report records according to the filter criteria you specify.
Delete
Select if you want to delete report objects.
Font
Select if you want to set font format for label or field text.
Background Color
Select if you want to change background color of label or field text.
Align
Select if you want to make label or field text left, center or right aligned.
Merge
Select if you want to merge tabular cells into one.
Split
Select if you want to split a tabular cell into two cells vertically or horizontally.
Exit
Select if you want to close a web report and exit Web Report Studio.
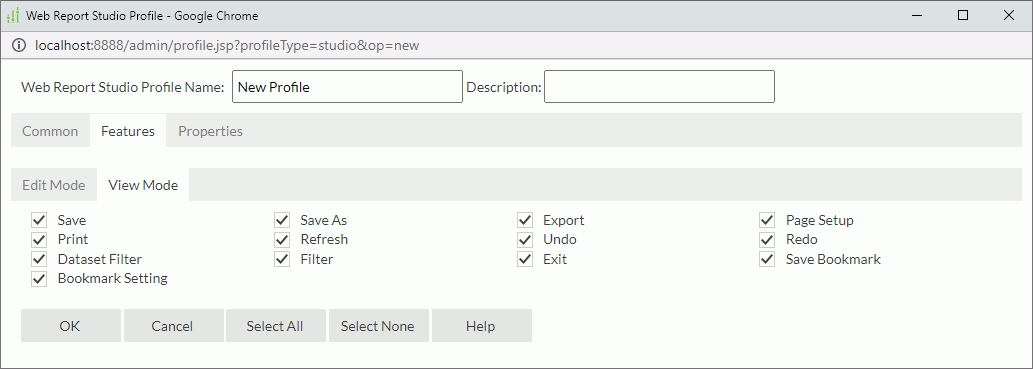
View Mode Properties
Turn on/off Web Report Studio view mode features for the profile.

Save
Select if you want to save changes to web reports.
Save As
Select if you want to save copies of web reports or web report page templates.
Export
Select if you want to export reports to disk or version in various formats.
Page Setup
Select if you want to configure report page settings.
Select if you want print web reports.
Refresh
Select if you want to reload report data.
Undo
Select if you want to undo previous operations.
Redo
Select if you want to reverse the operation of Undo.
Dataset Filter
Select if you want to apply filters to datasets that specified data components use to narrow down data scope.
Filter
Select if you want to filter report records according to the filter criteria you specify.
Exit
Select if you want to close a web report and exit Web Report Studio.
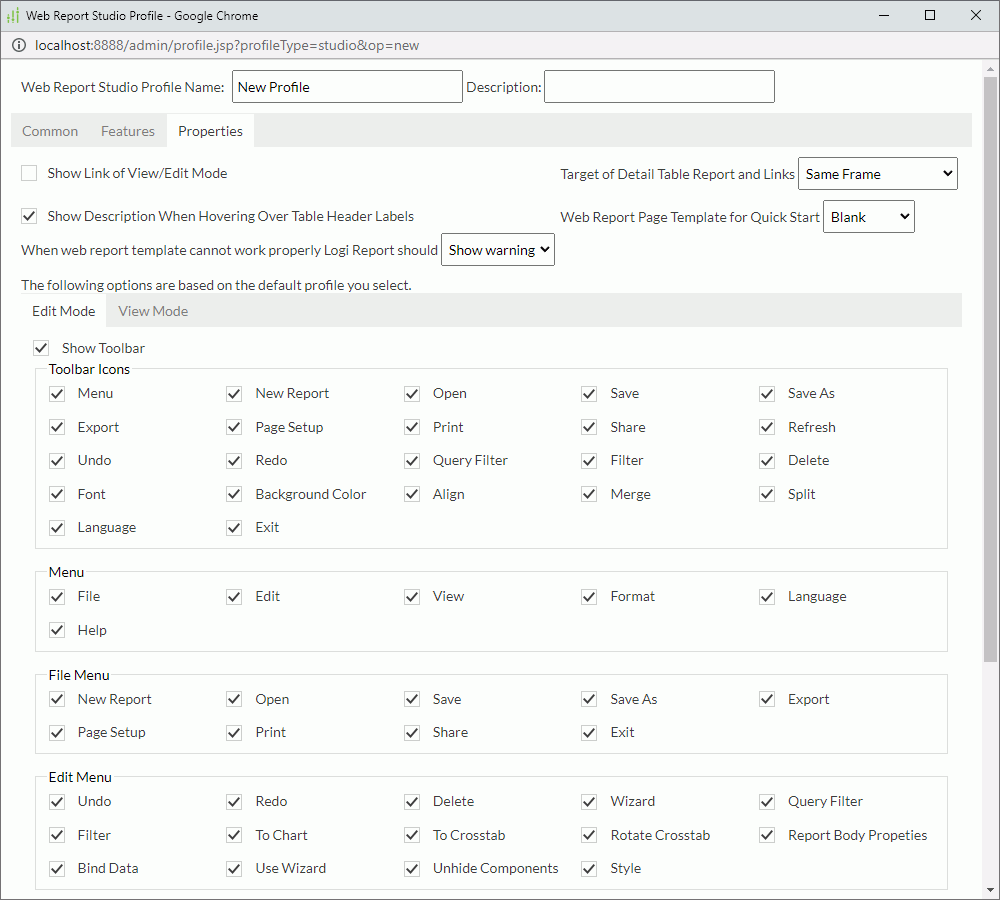
Properties
Specify the properties you want for the profile.

You can switch between View Mode and Edit Mode when running web reports in Web Report Studio. View Mode provides simple functions for mainly viewing reports, while Edit Mode provides editing and analytic functions.
Target of Detail Table Report and Links
Select where to load the linked target in Web Report Studio, which can be a link report, a URL, a chart hyperlink, or the detail table created from the go-to-detail function. The setting takes effect when you set Server Setting as the target frame when defining such links either in Report Designer or in Web Report Studio. New Window means to load the linked target into a new window, while Same Frame means to load the linked target into the same frame or window where the main report is.
Show Description When Hovering Over Table Header Labels
Select if you want to display the description of the related data field when you hover over a label in the table header in Web Report Studio.
Web Report Page Template for Quick Start
Select the default page template you want to use in the reports that you create using the quick start method.
When web report template cannot work properly Report should
Select how you want Report to deal with the situation when Server cannot create a web report with the selected web report page template, which uses a formula that references bound data to control the company logo.
- Stop
Select to stop creating the report. - Ignore
Select to remove all the data context like the bound data and formula from the template and continue creating the report. - Show warning
Select to display a warning message.
Edit Mode Properties
Specify Web Report Studio edit mode properties for the profile.
Show Toolbar
Server shows the toolbar which contains the menu options and toolbar icons for working with Web Report Studio. For more information, see Web Report Studio Window Elements.
Toolbar Icons
Server displays the following icons on the Web Report Studio toolbar: Menu, New Report, Open, Save, Save As, Export, Page Setup, Print, Share, Refresh, Undo, Redo, Dataset Filter, Filter, Delete, Font, Background Color, Align, Merge, Split, Language, and Exit. When you select Menu, you can further customize the items in the Menu list and the options for each submenu.
Menu
Available when you have selected Menu in the Toolbar Icons section. Server displays the following items in the Menu list: File, Edit, View, Format, Language, and Help. You can further customize the options on each submenu.
File Menu
Available when you have selected File in the Menu section. Server displays the following options on the File menu: New Report, Open, Save, Save As, Export, Page Setup, Print, Share, and Exit.
Edit Menu
Available when you have selected Edit in the Menu section. Server displays the following options on the Edit menu: Undo, Redo, Delete, Wizard, Edit Dataset Filter, Filter, To Chart, To Crosstab, Rotate Crosstab, Report Body Properties, Bind Data, Use Wizard, Unhide Components, and Style.
View Menu
Available when you have selected View in the Menu section. Server displays the following options on the View menu: Inspector, Editing Marks, and Refresh.
Format Menu
Server displays the following options on the Format menu: Font, Merge, Split. Enabled when Format in the Menu section is selected.
Show Panels
Server shows the following panels: Resources panel, Components panel, Parameters panel, and Filter panel. When you select this option, Server also selects the following four options.
Show Resources Panel
Server shows the Resources panel that lists all the available resources for an object that you select in the current report.
Show Components Panel
Server shows the Components panel that lists all the available components that you can insert into a web report.
Show Parameters Panel
Server shows the Parameters panel that lists all the parameters used by the current report.
Show Filter Panel
Server shows the Filter panel in which you can set the criteria to filter data fields.
Right-click Menu
Server shows a shortcut menu when you select the right mouse button, which can help you with most of the component operations in Web Report Studio.
View Mode Properties
Specify Web Report Studio view mode properties for the profile.

Show Toolbar
Server shows the toolbar which contains icons for working with Web Report Studio.
Toolbar Icons
Server displays the following icons on the Web Report Studio toolbar: Save, Save As, Export, Page Setup, Print, Refresh, Undo, Redo, Dataset Filter, Filter, Language, and Exit. For more information, see Web Report Studio window elements > Toolbar.
Show Panels
Server shows the Parameters panel and Filter panel. When this option is selected, Server selects the following two options too.
Show Parameters Panel
Server shows the Parameters panel that lists all the parameters used by the current report.
Show Filter Panel
Server shows the Filter panel in which you can set the criteria to filter data fields.
Right-click Menu
Server shows a shortcut menu when you select the right mouse button, which can help you with most of the component operations in Web Report Studio.
View Web Reports in Responsive Mode
Clear this option to disable Responsive View in the View Mode of Web Report Studio, which you access from a computer.
Align Center Report Content
Select this option and clear the View Web Reports in Responsive Mode option if you want to display the report contents centrally in the View Mode of Web Report Studio. By default, reports appear the upper-left corner in the View Mode of Web Report Studio, which may leave space on the right for a small report.
 Previous Topic
 Back to top