Update/Delete Options
Destination settings for Vizlib Writeback Table and Vizlib Input Form contain Update/Delete options which control the table lookup functions used when an Update or Delete writeback operation is triggered. You can find more information on writeback operations in our article here. We're going to reference Vizlib Writeback Table in this article, but it can also be used for Vizlib Input Form, using the Input Fields menu in the property panel.
Note: Update/Delete options are only found in SQL and Oracle writeback destinations.
This topic contains the following sections:
Update/Delete Options
Update/Delete options are defined in the Vizlib Management Console (VMC), under Writeback Settings > Destinations. You can find the setting in the Destination Settings panel (Figure 1).

Figure 1: Destination Settings
There are 2 options, and you select one of them using the radio button.
-
Match rows by values is the default option. Each column value for each row in the database table is checked and matched to the column values in Vizlib Writeback Table.
-
Match rows by Primary Key uses the primary key column for each row in the database table. The primary key is checked and matched to the primary key column in Vizlib Writeback Table.
Example - Values vs. Primary Key Comparison
Choosing Match row by Primary Key can improve the performance of update or delete operations when you're working with Vizlib Writeback Table.
-
Match rows by values - by checking every column value in each row, the operation can take longer to complete (especially if the table is large). Slower performance can increases the risk of application errors, which in turn increases the possibility of duplicate rows being generated, leading to the database table becoming out of sync with the writeback table.
-
Match rows by Primary Key checks each value in a single column - the Primary Key, which is a unique identifier for each row. This means the operation takes less time to complete and keeps performance in the application running effectively.
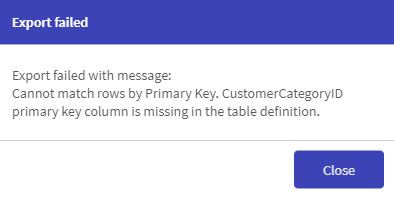
If you choose Match rows by Primary Key and then try to use Vizlib Writeback Table, you'll return an error with the message that the primary key column is missing (Figure 2).

Figure 2: Primary Key Error
To clear this error, you'll need to make a couple of extra changes - adding a primary key column in
Vizlib Writeback Table and editing your Qlik Sense data load script to include the primary key.
Adding a Primary Key Column
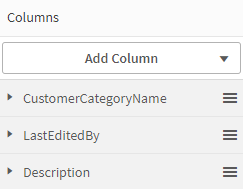
The first step to clearing the error is to add a primary key column in Vizlib Writeback Table. We're going to use a table called Customer Categories (Figure 3) as an example. The table currently has the columns CustomerCategoryName, LastEditedBy and Description.

Figure 3: Customer Categories Writeback Table
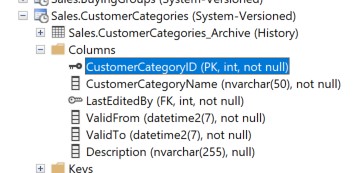
In the database, there's a Customer Categories table (Figure 4) with these columns, but also a column CustomerCategoryID, which is classed as a PK (Primary Key).

Figure 4: Customer Categories Database
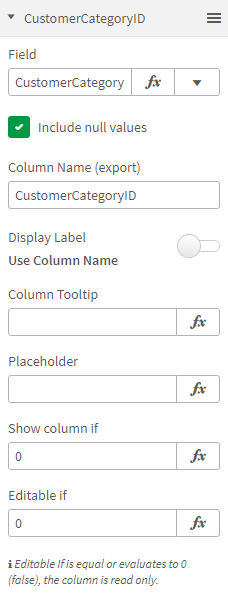
In Vizlib Writeback Table, use Add Column to create a column CustomerCategoryID (Figure 5).
Note: You should enter 0 in Editable if to make it non-editable, and check that it is included in any export of table data. You can also enter 0 in Show column if you want to hide the column from view.

Figure 5: Category ID Column
Working with Vizlib Writeback Table - Data Load Updates
Next, update your data load script to add the CustomerCategoryID column, and ensure data is loaded correctly back into the app. Otherwise, it will look like the operation isn't completing.
The data load script is part of the Qlik Sense environment, you can find out more about editing the data load script in a Qlik Sense app here.
Note: Use * to specify all columns in the table should be loaded. This is especially useful when you expect the content of the table to change (e.g. by adding new columns).
When you've completed these steps, the table will be loaded back into the app correctly and you can start to use Vizlib Writeback Table with the Match rows by Primary Key setting.