Optimising Reloads Using Binary loads
This topic contains the following sections:
Reducing Writeback Table Reload Times
This article explains how to improve efficiencies when using Vizlib Collaboration Writeback operations - the suggestions apply to both Qlik Sense Enterprise and Qlik Cloud (SaaS).
In 30 minutes, the Vizlib Collaboration - Writeback Decoded: Optimising reloads webinar (embedded in this article) takes you through the steps and tips for improving reload times.
Reviewing the stages in a QVD writeback operation
There are four stages that Qlik runs through when a QVD file is reloaded after writeback. Approximate timings include:
-
Opening the app - 2 seconds.
-
Loading data - 20 seconds.
-
Creating the search index - 15 seconds.
-
Saving the app - 3 seconds.
It's possible to optimize reloads in Qlik by removing steps 2 and 3 for every reload. The two options are to:
-
Reload from QVD without the search index - 25 seconds.
-
Create a Binary load without a search index - 5 seconds.
Note: We recommend using a Binary load instead of using the Partial reload option, as it is impossible to debug a partial load in the data load editor, and a partial reload will fail if there are commands with references to tables that existed during the full reload. All script functions are supported with a Binary load, and a binary load has the same content as a full reload.
Understanding the Writeback Reload
If you're using Vizlib's Collaboration Writeback table for Qlik Sense Enterprise, you likely have some files that take longer to reload as part of your writeback table updates.
The example below shows a common use of writeback to upload changes to a Forecast adjustments table with the additional user comments as part of what must be saved.
Over time, the history of all comments and the search indexing performed by Qlik can cause the reload times to continue to increase, potentially slowing productivity within your teams.
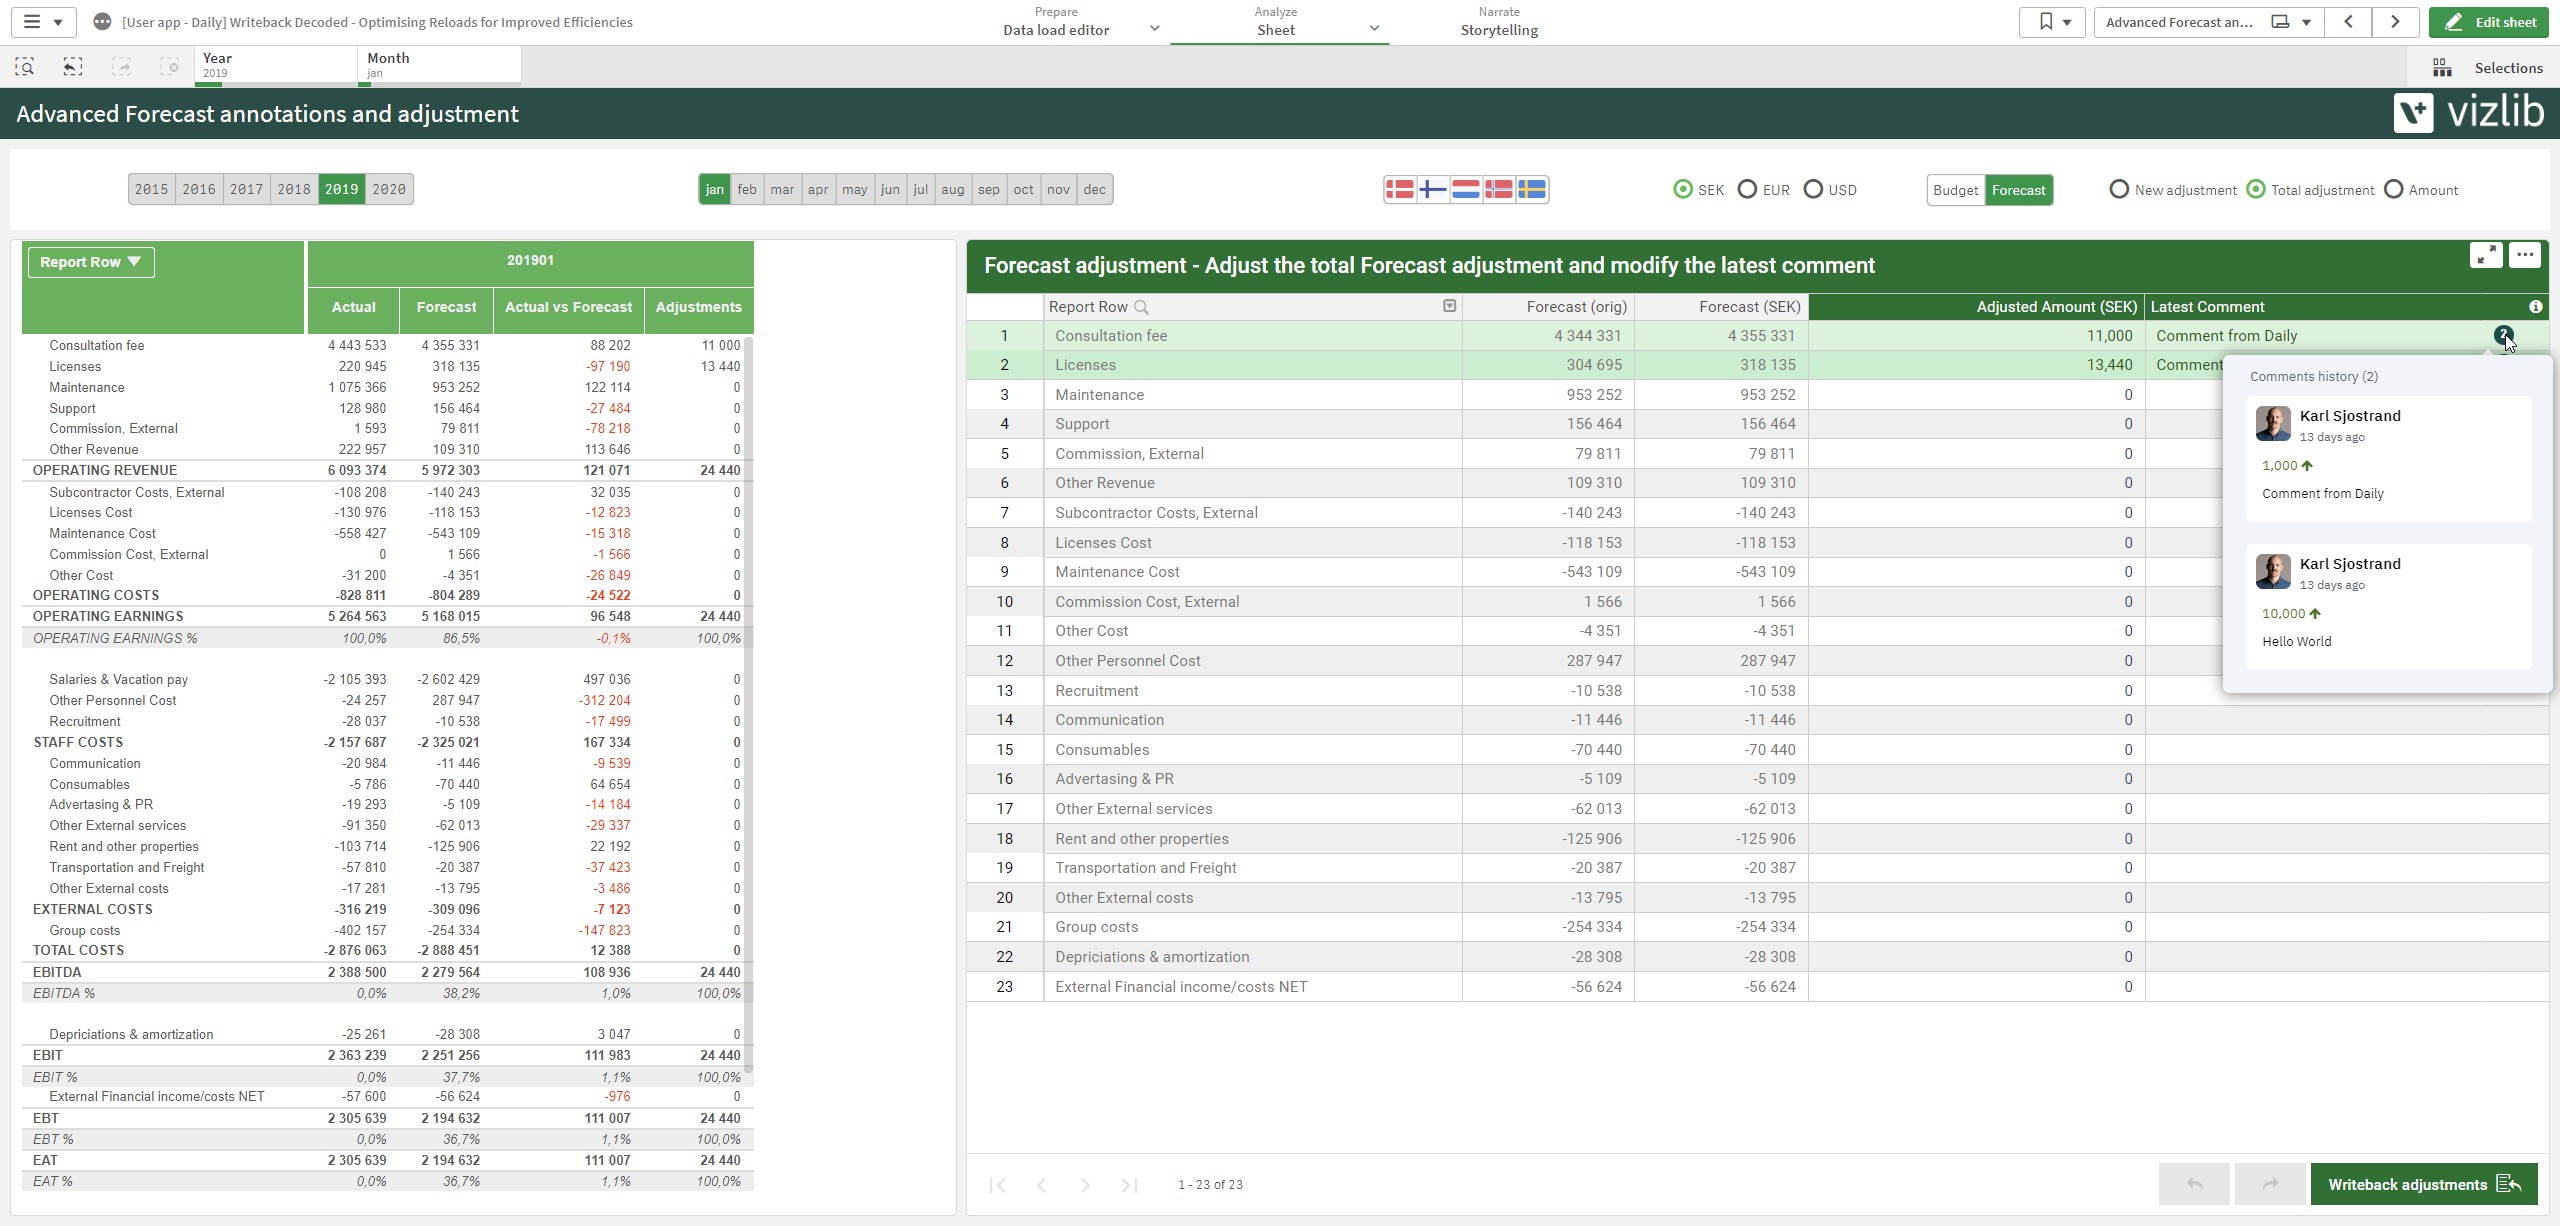
Figure 1: Example of a Finance annotation and adjustments application
Applying the Method to Your Business’s Needs
Note: The first search after you enable search indexing will take longer to refresh as it pulls in the data from when it was disabled.
Our suggestion to disable the indexing used by search - isn’t to keep it off all the time. These are methods of optimization where you use the methods when it’s to your advantage. For example, switching off the index for a few days, where you're making many updates, allows you to make updates faster. Enable the search indexing again when you want to search through and review the analytics and comments in depth.
You can also enable or disable search indexing for specific fields to customize the optimization method for your business’s needs.
Viewing and Amending the QVD Reload Steps
-
Open a QVD file from the section QVD Load, select the QVD file, and click Upload to view the data load progress. After the lines are fetched, the Qlik injected steps Creating search index and Indexing field: Descriptions display in the list.
-
Once the reload is complete, click Main; the Qlik-generated code displays all the steps Qlik takes when reloading the QVD. In the list that displays, scroll down to the line: SET CreateSearchIndexOnReload and change the 1 to a zero to stop this task.
-
Reload the QVD and check the elapsed time of the data load progress. This may reduce your time by half.
Using a Binary Load to Reduce Reload Time
Please see our articles for the process steps:
Aggregating the History to Reduce Load Times
In addition to the steps above, as the history file grows, you can also reduce load times by limiting the data using current period, such as:
-
Splitting out the month's comments from the data but keeping them in the monthly report.
-
Splitting the daily files - depending on how much of the history you save.
On the left side of the diagram, we show the option to keep the full writeback history, and on the right side, it shows splitting the writeback files into daily files, which creates an aggregated history with the binary load, and we only transform the writeback data from today's file on each reload.
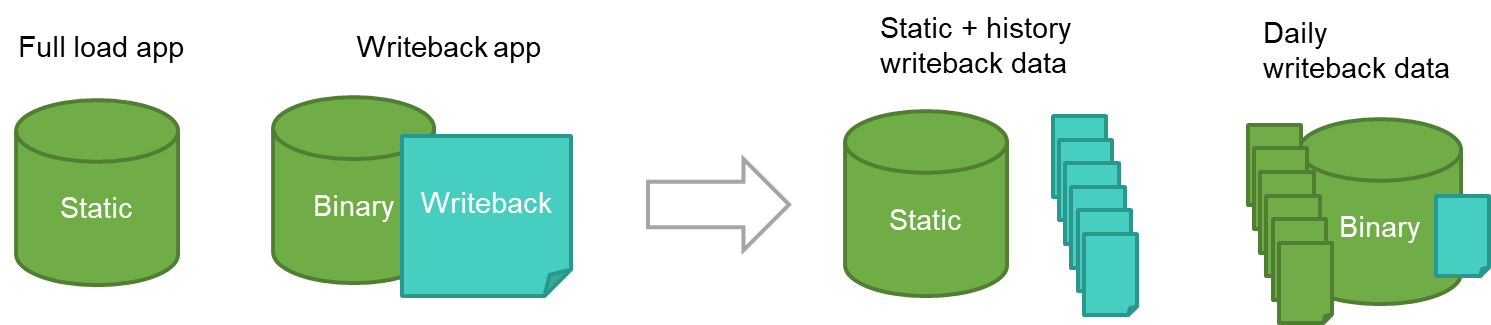
Figure 2: Transforming the size of your Writeback reload file.
Practice Optimizing Reloads with a Vizlib Writeback Table
While viewing the webinar above, you can also practice optimizing the reloads or simply use them as a reference.
At the bottom of the page, you'll find a PDF of the presentation and three sample QVD files for you to download and follow the steps while watching the demo in the webinar. We've also included the Q&A from the end of the webinar.
1. Import the Demo Applications
-
Download the three demo applications (saved at the end of this article).
-
Open the Qlik Management Console (QMC).
-
In the Apps section, click Import, and choose the files for the demo apps (see the table for their names and description).
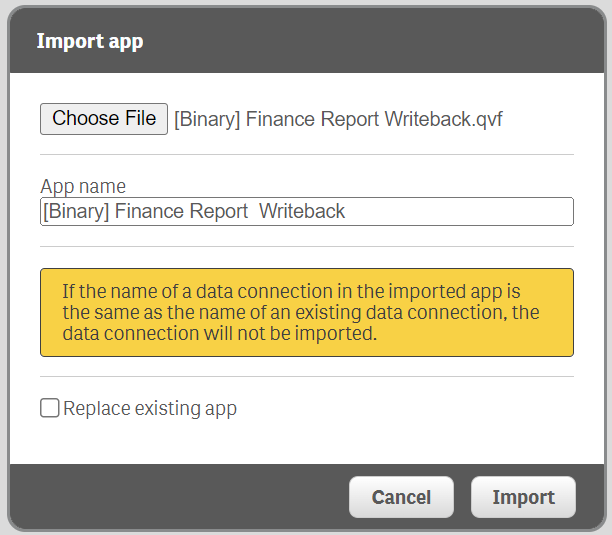
Figure 3: Import app modal in Qlik Management Console (QMC)
|
App name |
Description |
|---|---|
|
[Binary] Finance Report Writeback.qvf |
Finance data, general ledger, accounts, etc. |
|
[Binary - History] Writeback Decoded - Optimising Reloads for Improved Efficiencies.qvf |
Binary loads of finance data, aggregates all writeback data from yesterday and back. |
|
[User app - Daily] Writeback Decoded - Optimising Reloads for Improved Efficiencies.qvf |
Binary loads of the history app and combine the writeback data with data from today. |
The QMC apps section should list all the apps after they're imported (Figure 4).
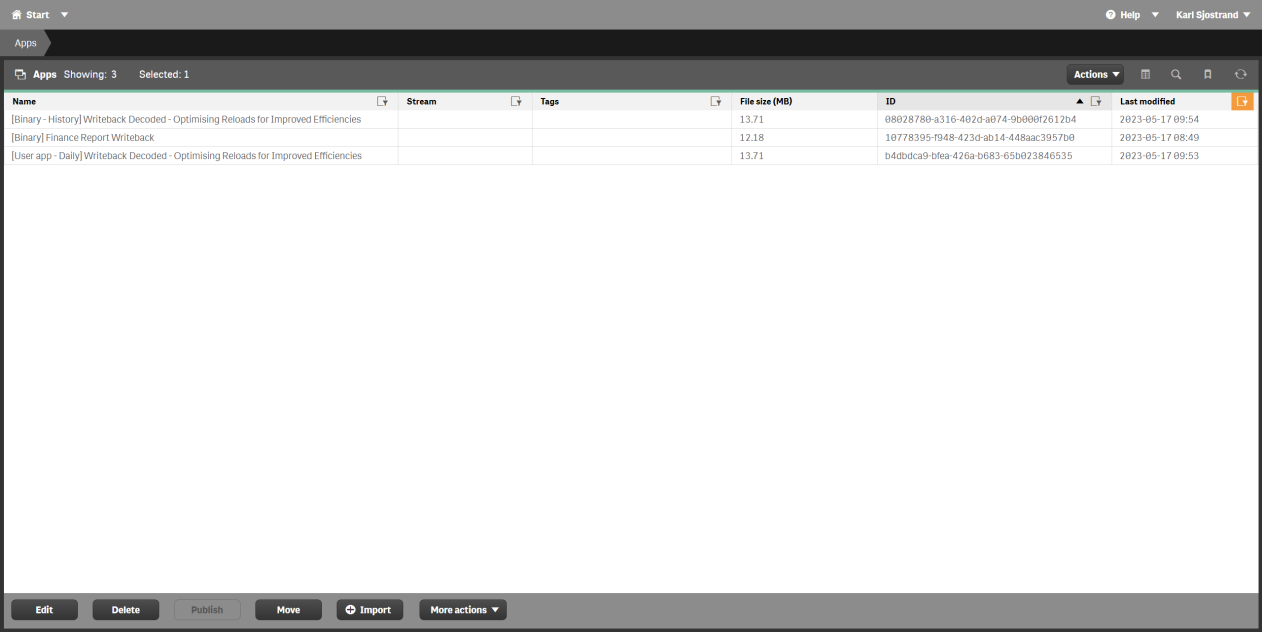
Figure 4: QMC app section after import of demo apps.
2. Create Binary Load App Data Connections
-
Create binary data connections for the files (Figure 5):
-
[Binary] Finance Report Writeback.qvf
-
[Binary - History] Writeback Decoded - Optimising Reloads for Improved Efficiencies.qvf
-
-
Name the data connections (Figure 6):
-
BinaryFinanceReportWriteback
-
BinaryHistoryDailyReloads
-
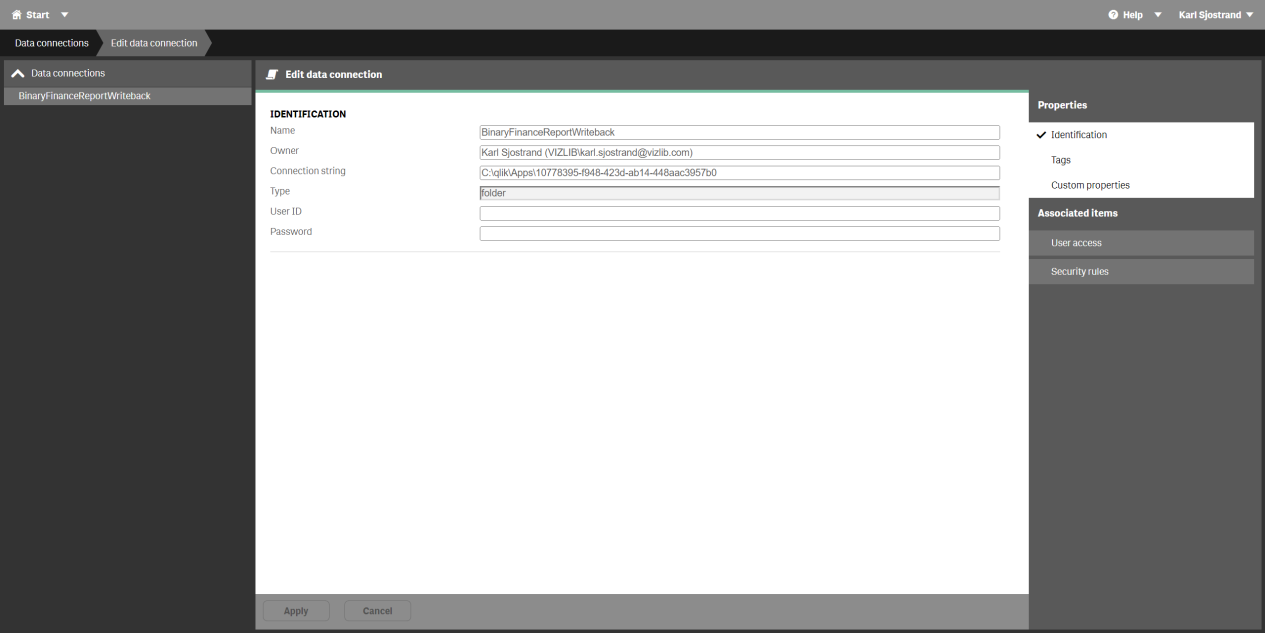
Figure 5: Data connection - BinaryFinanceReportWriteback
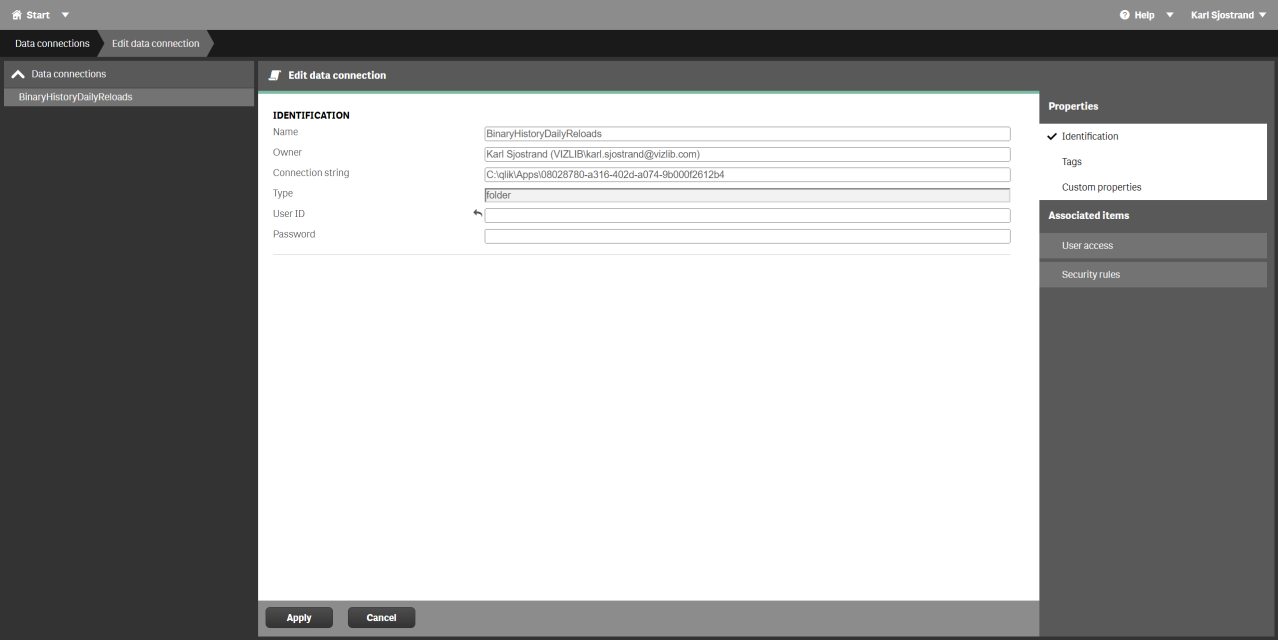
Figure 6: Data connection - BinaryHistoryDailyReloads
3. Create a Folder Connection for Writeback QVDs
-
Create a new folder connection with a suitable name (e.g. WritebackFinanceDemoData). The Load script generates the QVDs needed for this application on its first reload. It's also possible to reset the QVDs to their default from the Settings sheet if you make a mistake (Figure 7).
Note: If you use another name than WritebackFinanceDemoData, the DataConnectionName variable must be updated with the name.
-
Update the Data Connection Name variable, if required (Figure 8).
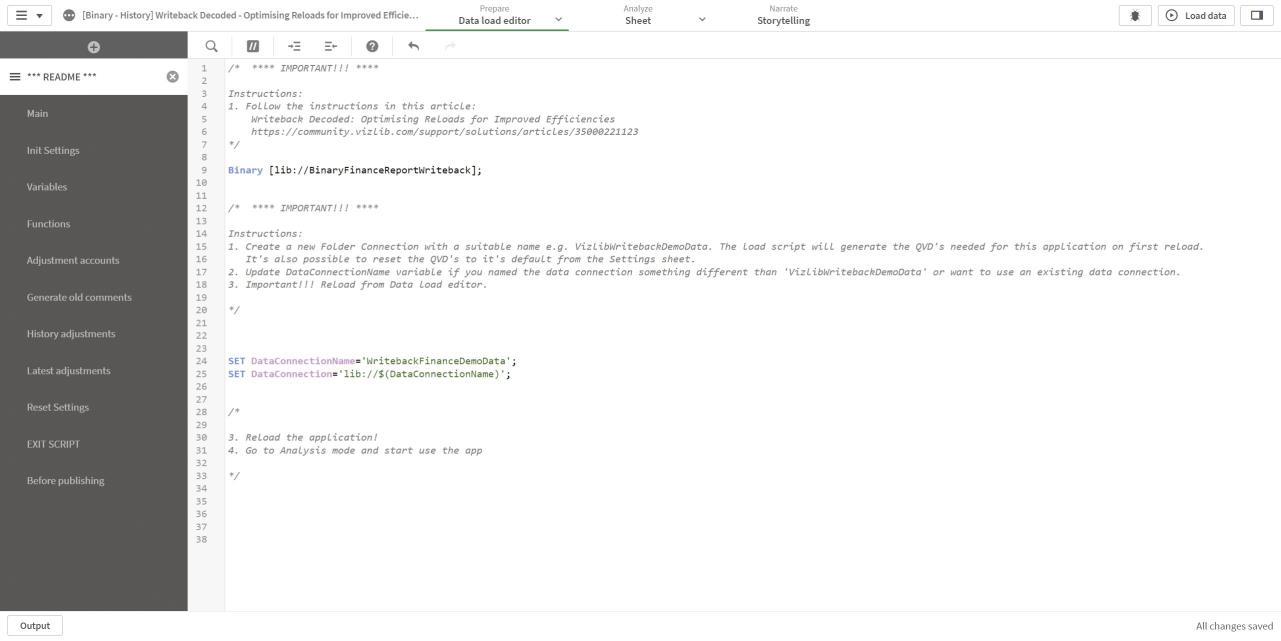
Figure 7: Data load editor history app
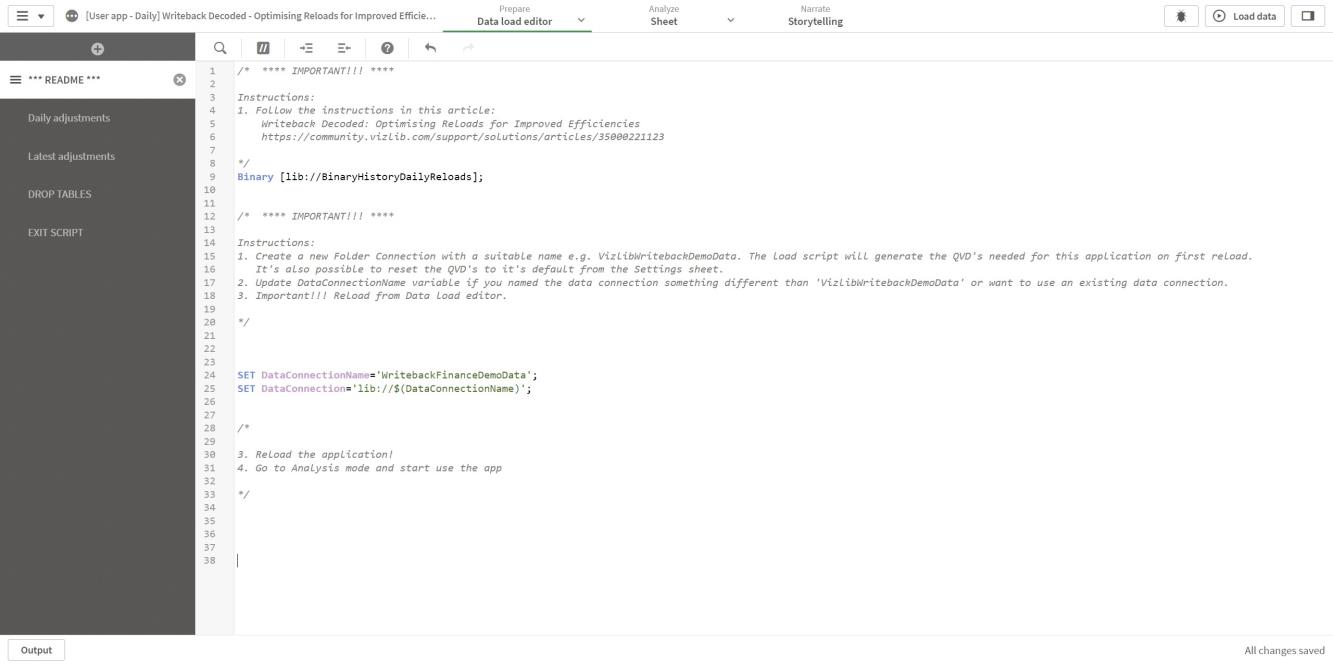
Figure 8: Data load editor user app
4. Reload the Applications
Reload both the history and the user application from the data load editor.
Note: The Finance Report writeback application is not configured to be reloadable, so reloading that application is unnecessary since the data is static.
5. Create the Destination in the VMC
-
Log in to the VMC.
-
Click Writeback Settings.
-
Click Destinations.
-
Create a new writeback Destination with the name SnackableDailyAdjustments (Figure 9).
-
In the Writeback Settings, change the Operation to Insert.
-
Use the {{APPID}} dynamic tag to reload the application the user has opened when connected to the destination.
-
In the QVD-CSV-TXT Destination Settings, configure the subfolder to Daily and the filename to Adjustments {{DATE}}.
-
Using the {{DATE}} dynamic tag generates a new QVD for each day with the format e.g., 20230517.
-
Enable Disable new file confirmation by sliding the toggle to the right to prevent the user from confirming that a new file will be created when doing the first writeback of the day.
-
In the Locking section, enable Row locking by sliding the toggle to the right (Figure 10).
-
Click the button Add Destination to create the destination.
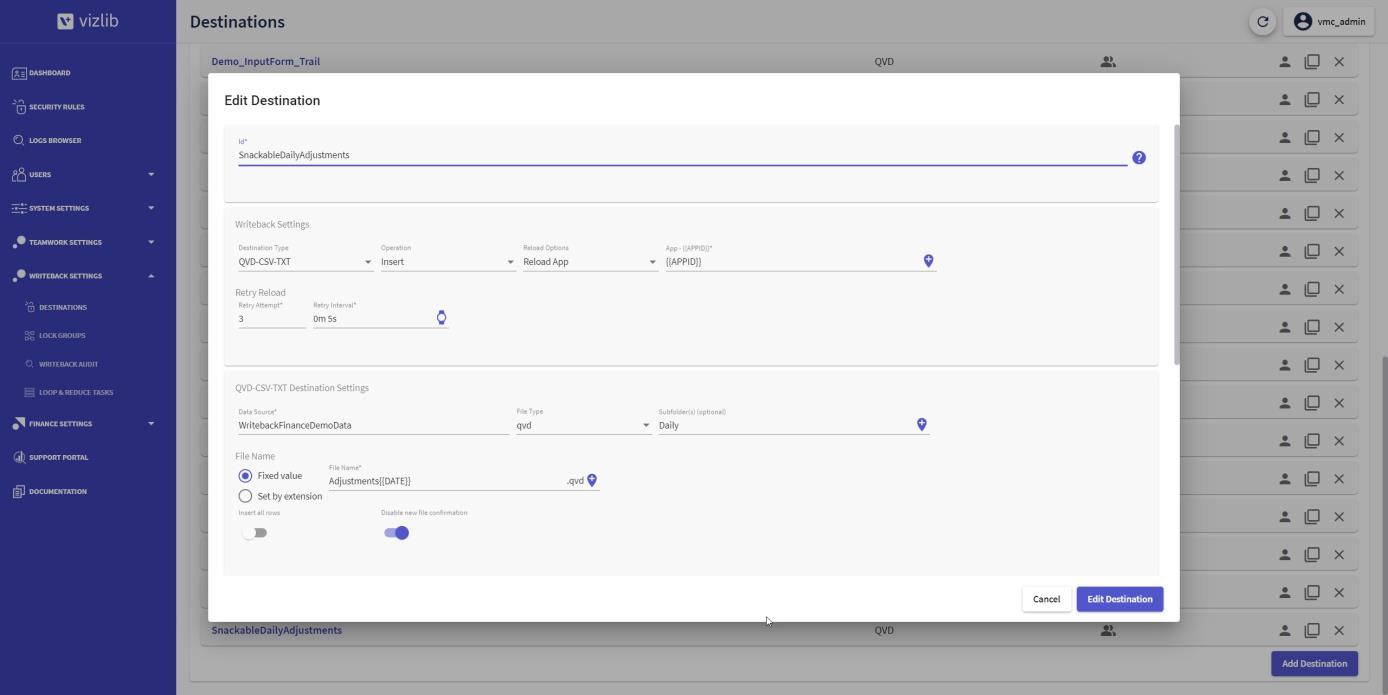
Figure 9: Writeback destination SnackableDailyAdjustments
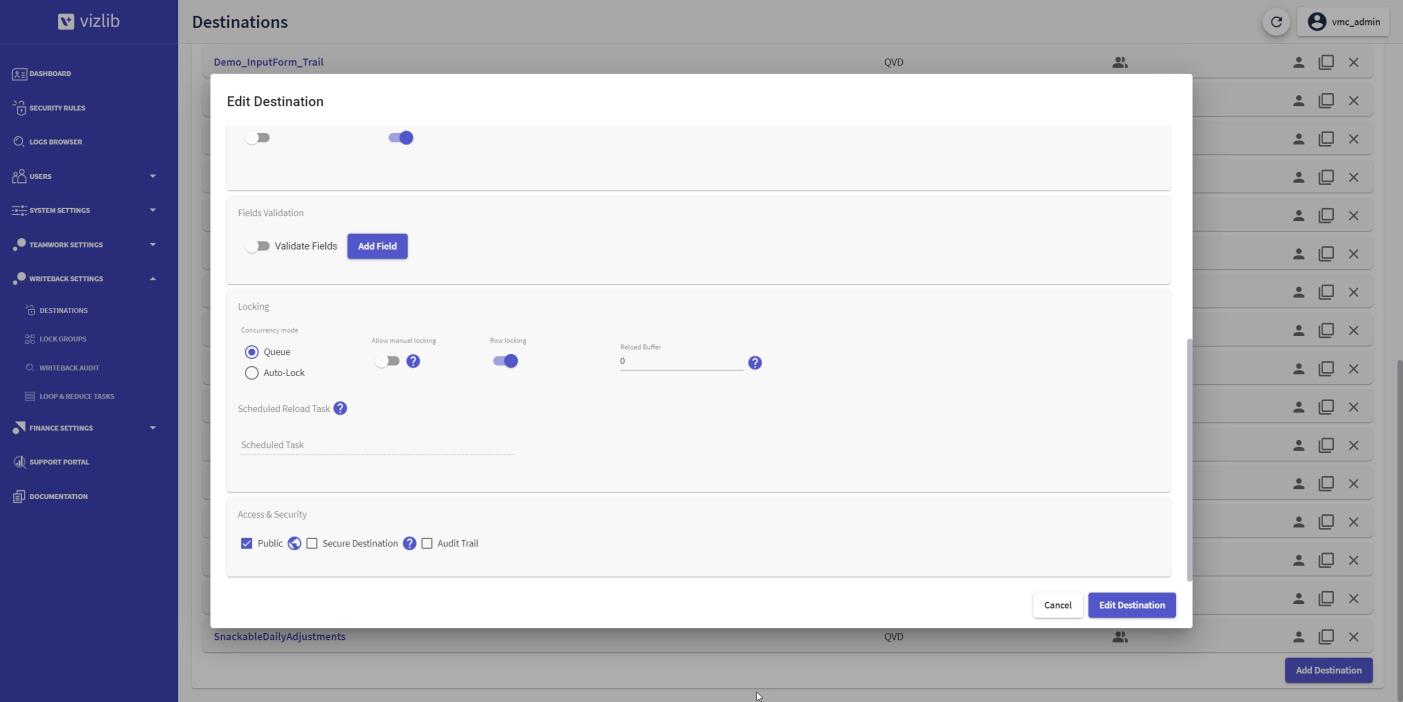
Figure 10: Writeback destination SnackableDailyAdjustments - row locking
Explanation of the Load Script in the Different Applications
Aggregating the History Used in the Binary File
To load comments and adjustments from yesterday and further back in the binary app, we loop through all the daily adjustments files (lines 11-21) and store them in a temporary table ForecastAdjustments.
-
If the data at the end of the file name equals today's date, we skip that file (line 14).
-
At line 23, the table is concatenated to the general ledger.
-
In line 32, the adjustments are marked as adjustments to distinguish them from the original forecast.
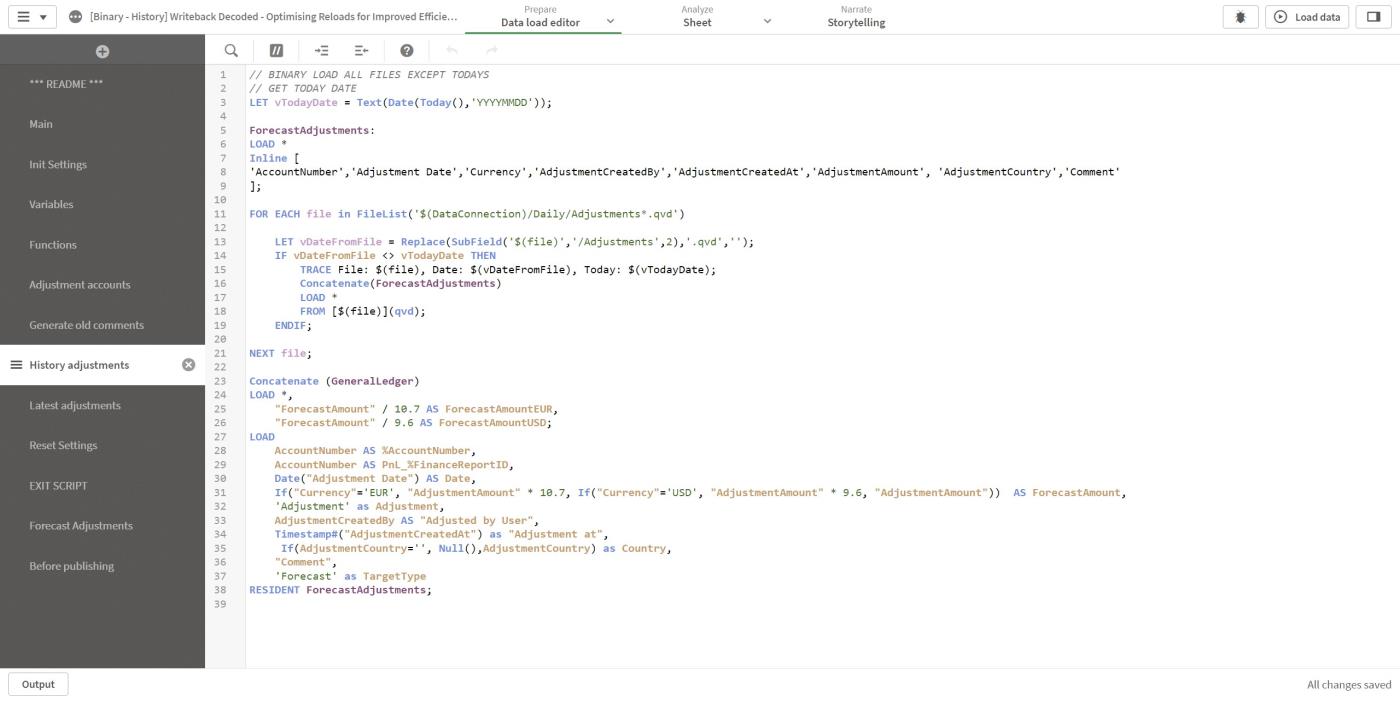
Figure 11: Data load editor History adjustments section
Loading the Latest Comments
To load the latest comments from yesterday and further back in the binary app, generate the comments displayed in the table as the latest comment for that row.
-
The temporary table ForecastAdjustments from the previous section is used to generate the latest comments for each key of each unique combination of AccountNumber, Adjustment Date, and AdjustmentCountry by loading the max AdjustmentCreatedAt.
-
The latest AdjustmentCreatedAt are loaded with the Max function for each key, and with that, the ForecastAdjustments table is joined back with all the columns for the latest rows.
-
At line 22, the temporary table ForecastAdjustments is dropped as it's not needed anymore.

Figure 12: Data load editor Latest adjustments section
Loading the Daily User Comments and Adjustments
In the User app - Daily, the same processes occur as in the History app except that the file with the same ending date in the filename as of today is loaded.
If the file for today's writeback data isn't available, the steps after lines 4-6 are skipped to save time.
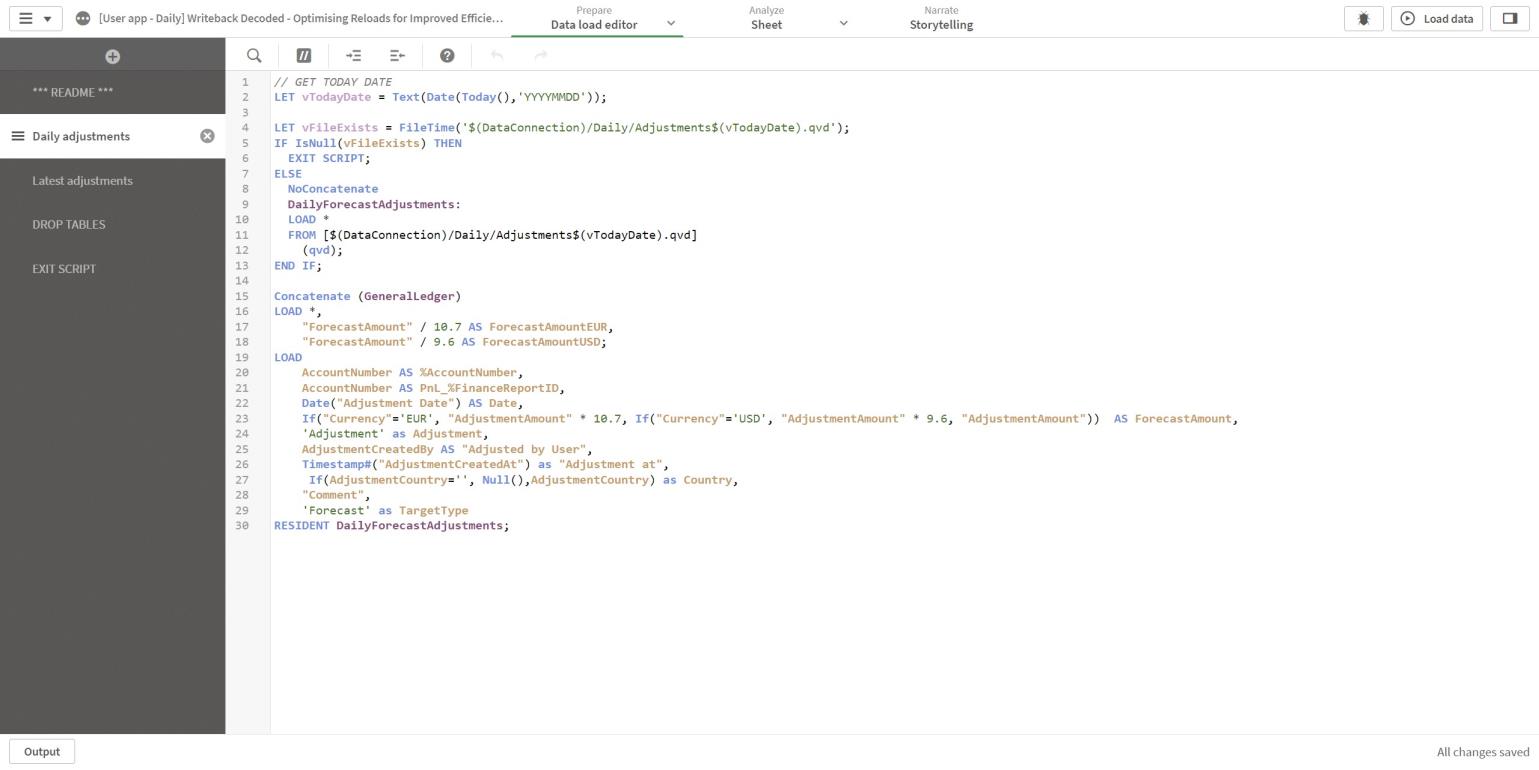
Figure 13: Data load editor Daily adjustments section
Loading Today's Latest Comments
To load the latest comments from today, the same processes occur as in the History app when loading the latest data for each key (lines 1-20).
The next step combines the latest daily comments with the latest history comments. The history table and daily table are concatenated, except any history row if the key already exists in the daily table.
The NOT Exists function on line 3 skips any already existing keys.

Figure 14: Data load editor Latest adjustments section
Cleaning Up
The last bit is to clean up the temporary tables that combine the daily file and the historical data.
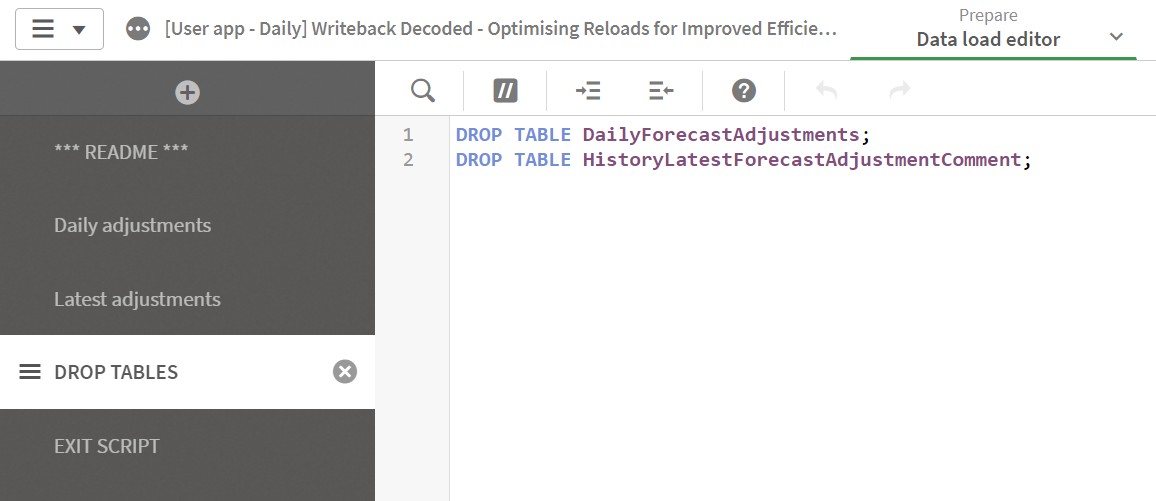
Figure 15: Data load editor DROP TABLES section
Q&A
These are the questions and their answers provided during the Writeback decoded webinar.
|
Question |
Answer |
|---|---|
|
Does using binary load require legacy mode? |
Binary load is available in Qlik's standard mode; legacy mode is not required. |
|
Would you recommend partial reload or binary load? |
We recommend binary load over partial reload. Partial reload comes with limitations that binary load does not have, and debugging in the data load editor is impossible. You can read more in the Qlik article on Partial Reloads. |
|
What does CreateSearchIndexOnReload do? |
The variable CreateSearchIndexOnReload defines whether search index files are created during a data reload. You can read more about this variable in the Qlik article CreateSearchIndexOnReload. |
|
How much time does splitting the daily files, as in that last example, save? |
Just one or two seconds. Smaller files make opening and saving files quicker. |
|
Will you share the presentation? |
Yes, it's saved at the bottom of this article with the demo apps. |
|
Will you share the script shown in a module? |
Yes, it's saved at the bottom of this article with the presentation. |