VMC Setup - QVD/CSV/TXT
Note: This article can also be used to configure destinations in Vizlib Input Form.
Vizlib Writeback Table can be set up to use a range of data sources, and we're going to show you the setup options for QVD/CSV/TXT files to be used with Destinations. Data sources can be configured in the Vizlib Management Console (VMC) when they have been added to your Qlik Sense Environment. Using a VMC Configuration with data files means you can take advantage of Vizlib Server functionality to manage the data source.
Note: While destinations can be set up in Vizlib Writeback Table without a VMC configuration, we recommend it is used only for small-scale data sets or use cases (e.g. a pilot for a project). You can find instructions on configuring destinations here.
Note: Vizlib Writeback Table supports Qlik Sense data encryption for QVF / QVD files. You can find full details here.
This topic contains the following sections:
Before you Start - Checklist
Before you start, you'll need to make sure you have all the information and permissions you need. Work through all the items in this list and then you'll be ready.
-
Installations - Vizlib Writeback Table and Vizlib Server should be installed before you start. We have online tutorials for installing Vizlib Server and Vizlib Products to help you (Vizlib Products are installed in the same way, so while the tutorial uses Vizlib Library, it can also be used for Vizlib Writeback Table).
Note: If you haven't installed any Vizlib products before, please install the product (Vizlib Writeback Table) then install Vizlib Server. If you have already installed Vizlib Server, please perform a restart after installing Vizlib Writeback Table.
-
VMC login / Password - to create and configure the destination. The VMC is installed as part of Vizlib Server.
-
Writeback Operation / Reload Option - for configuring Writeback settings.
-
Data Source name - to enter when you're adding the integration.
-
File Type - choose the type of file you want to use from QVD, CSV or TXT. You can also specify a file path as an optional field.
-
App name (Optional)- a writeback reload option. Refers to the app you want to reload after a writeback operation is completed. You can create a new app, or re-configure an existing one.
-
Task (Optional) - a writeback reload option. Refers to the task (reload) you want to start after a writeback operation is completed. Tasks can be created and stored in the Qlik Management Console (QMC).
-
Security Rule - to set up secure access for a destination, a security rule should be configured in the VMC. See our article here for more information on setting up a security rule.
Adding a Destination
Now, you'll need to add a Destination, which is the data source for your Writeback table. You can find our more about destination types in our article here.
Note: By default, an auto-lock is triggered when a writeback operation is performed on a destination, and stays in place until the operation completes. You can enable the Allow Locking setting in Access and Security if you'd like to extend the locking function.
-
In the VMC menu, click on Writeback Settings, then Destinations and Security. If you've already added any destinations you should see them displayed on the page (Figure 1).
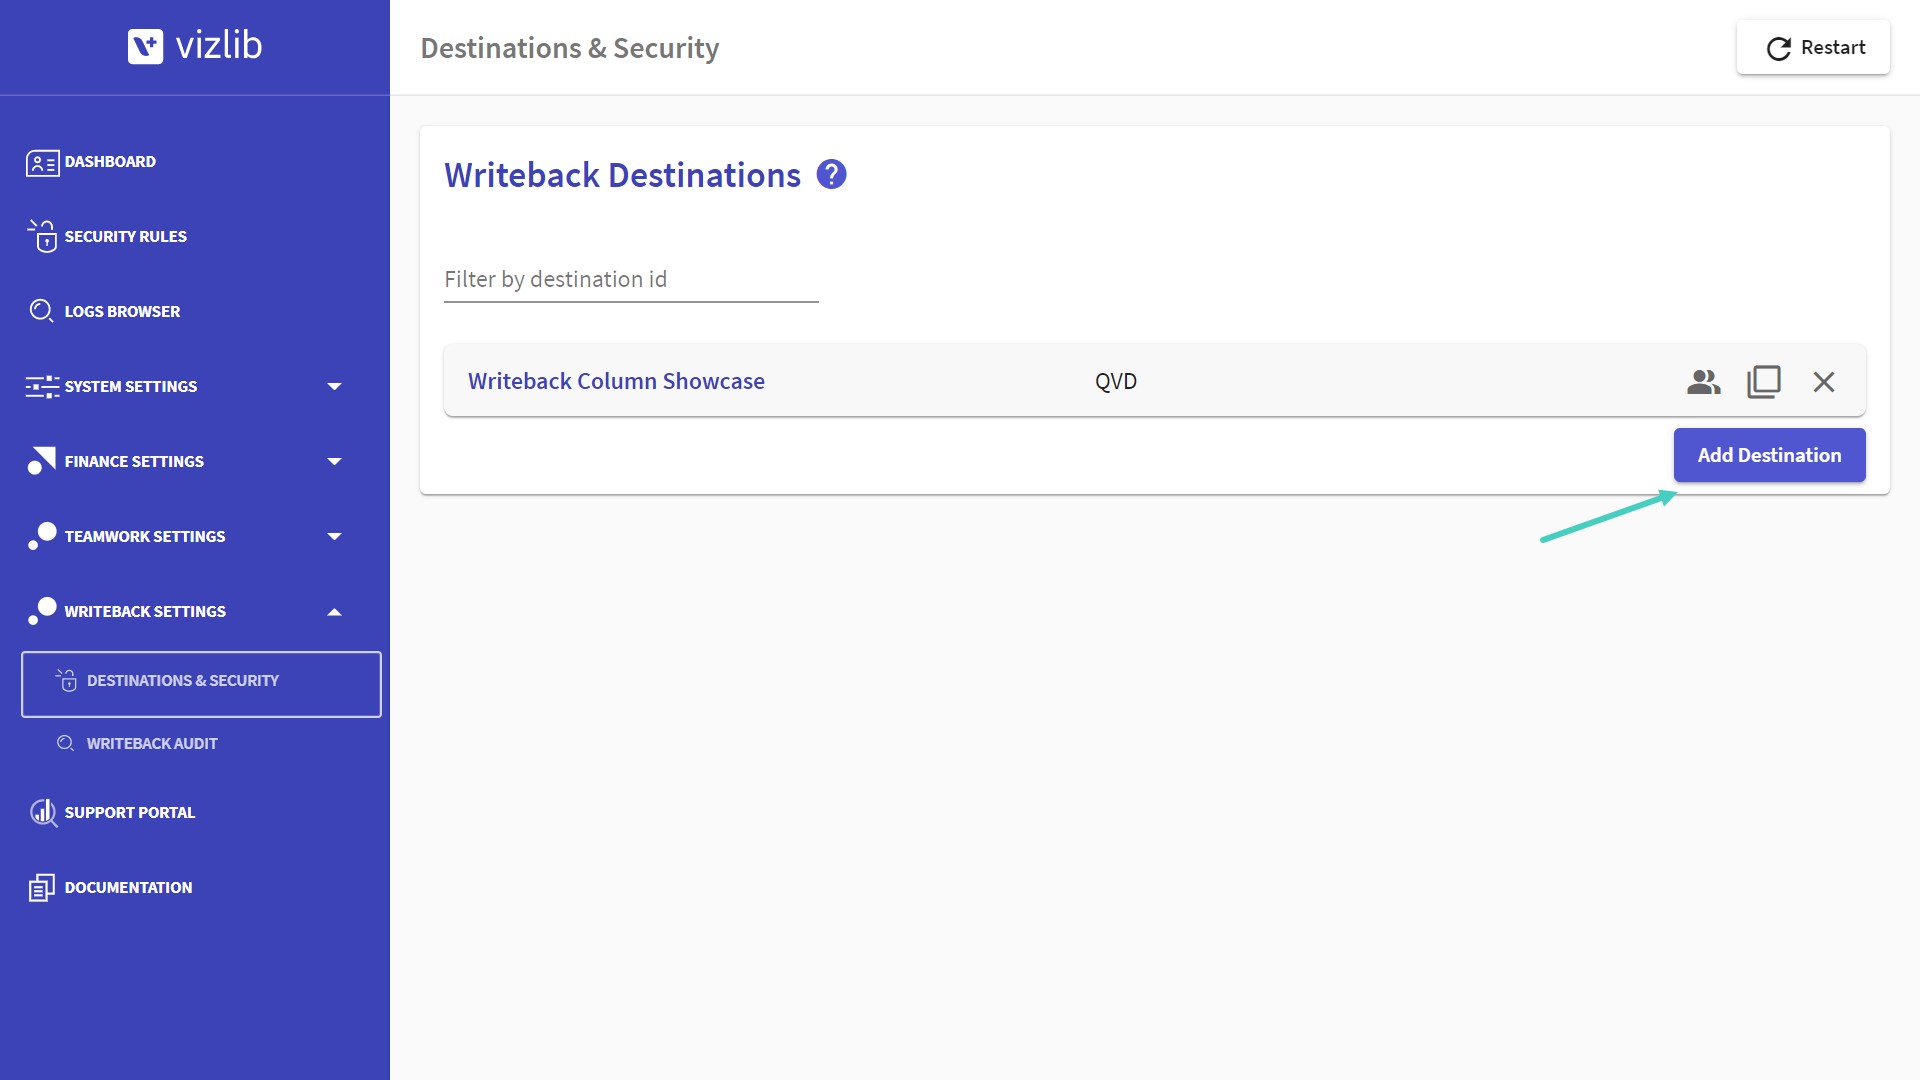
Figure 1: Destinations
-
Click Add Destination and you'll create a new entry. Click on the destination ID to add your destination data.
Check: Your destination will already have an ID which is generated from the last entry in the table. You'll be able to change this in the next step.
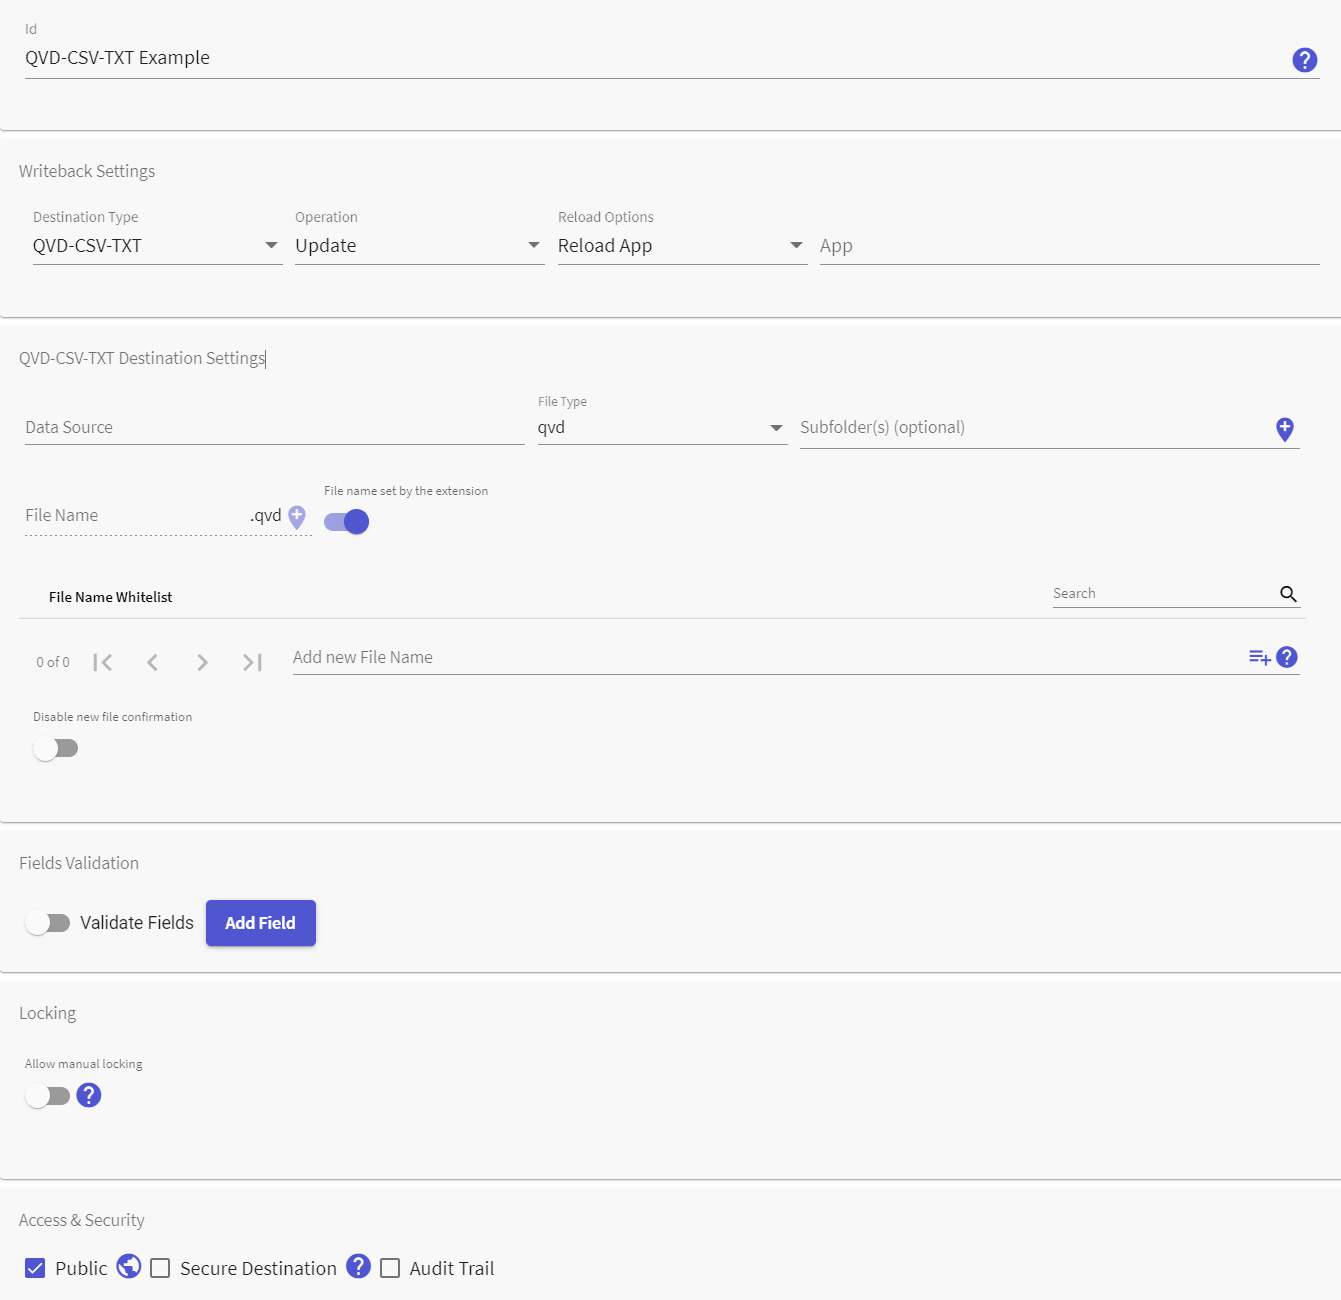
Figure 2: Destination Settings - Overview
-
Enter a destination id, then go to the Writeback Settings panel and select QVD/CSV/TXT as the Destination Type (Figure 3).
Check: Destination ID has to be a unique value, or you won't be allowed to save your changes.
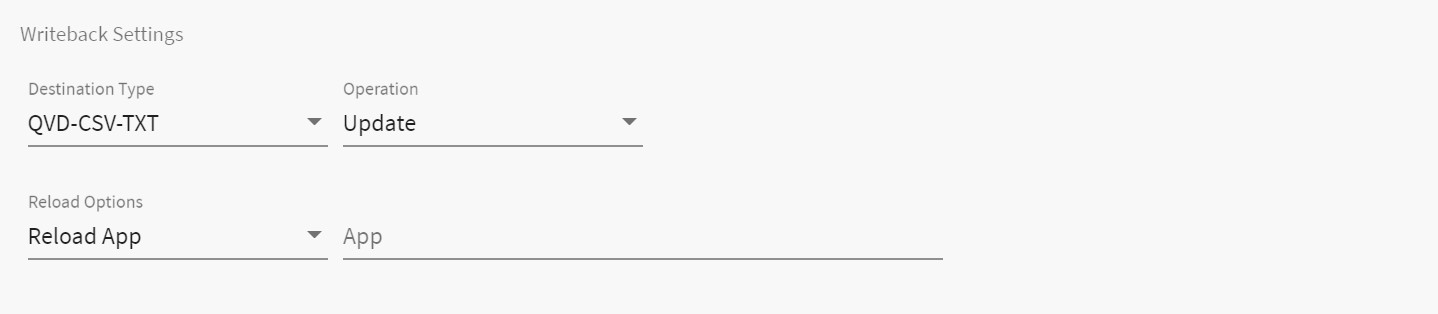
Figure 3: Writeback Settings
-
Select the writeback Operation you want to use from the drop-down list (Insert, Update, Delete and Overwrite). For more information on Writeback operations please see our article here.
-
Choose one of the Reload Options (No Reload, Reload App, Partial Reload App, Reload Task).
Check: Reloading the app means when data is written back to the destination it is immediately available to other users, so you'll probably have to pick an option which enables reload. You can find more information in our article here. Reload Task is set in the Qlik Management Console, you can find more information here.
-
Add the writeback App you want to use. Apps are listed alphabetically with the App ID displayed. The app id is intended to make it easier for you to find an app you need to use, or one you've used before.
Now you can configure your destination in the Destination Settings panel (Figure 4).
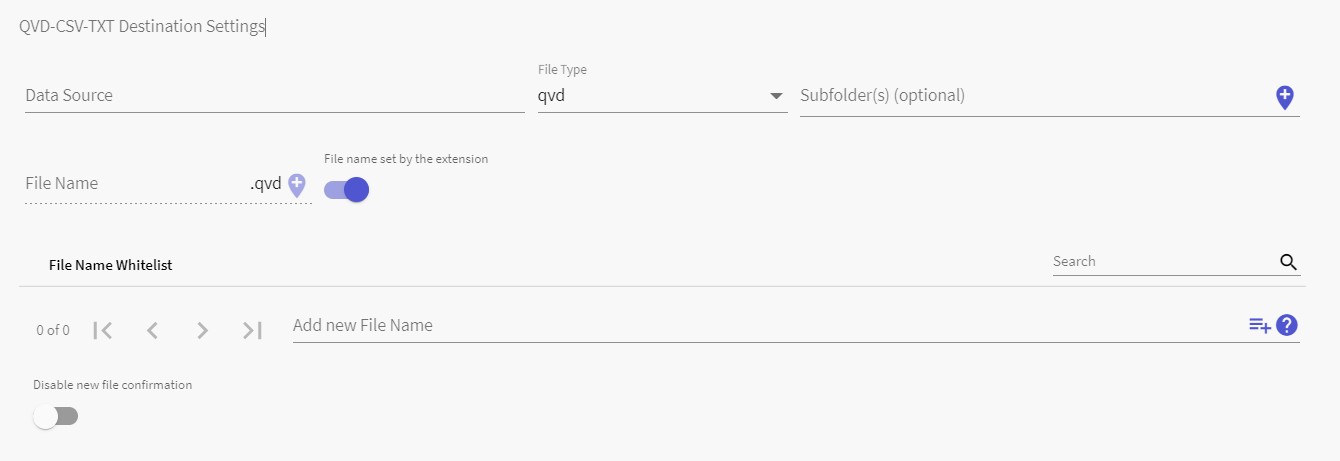
Figure 4: Destination Settings
-
Choose the Data Source you'd like to use, and select the File Type from the drop-down.
-
Enter the File Name you'd like to use for saving your changes.
-
As an optional step, you can enter a Path for the file. Any values entered here create a subfolder.
-
To the right of the file name there is a toggle File name set by the extension. Enabling this setting will open settings where you can add specific names to the File Name Whitelist by entering them in Add new File Name and clicking
 (wildcard symbols like * are supported). Once this setting is enabled, you'll need to specify the destination filename in the app under Writeback Settings. Adding a whitelist makes it easier to regulate file naming, access and structure, so it's useful if you're setting up a destination accessed by large numbers of users.
 -
You can create a dynamic File Name and Path using Dynamic Tags. If you click
 you'll open a list of values you can use (Figure 5). You can find out more about dynamic tags in our article here (https://community.vizlib.com/suppor t/solutions/ar ticles/35000193729).
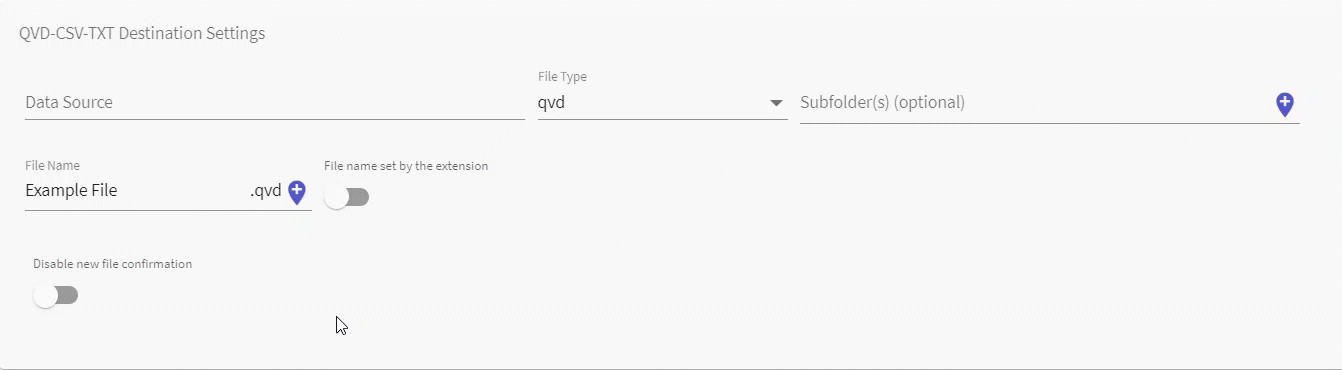
Figure 5: Using Tags
Note:
When you're using dynamic QVDs, you'll create a new file with each new writeback operation, so you can choose to vary the default destination settings.
-
When a new file is created, a dialog appears to confirm the file action. If you activate Disable new file confirmation the file confirmation dialog won't be shown with every writeback.
-
Disable auto-lock will turn off the auto-lock function, as data is not loaded back into the app when a new file is created with every writeback.
If you need to define your data field names, you can do this Fields Validation (Figure 6).
Note: Writeback operations using this destination must contain exactly the same field names as defined here.
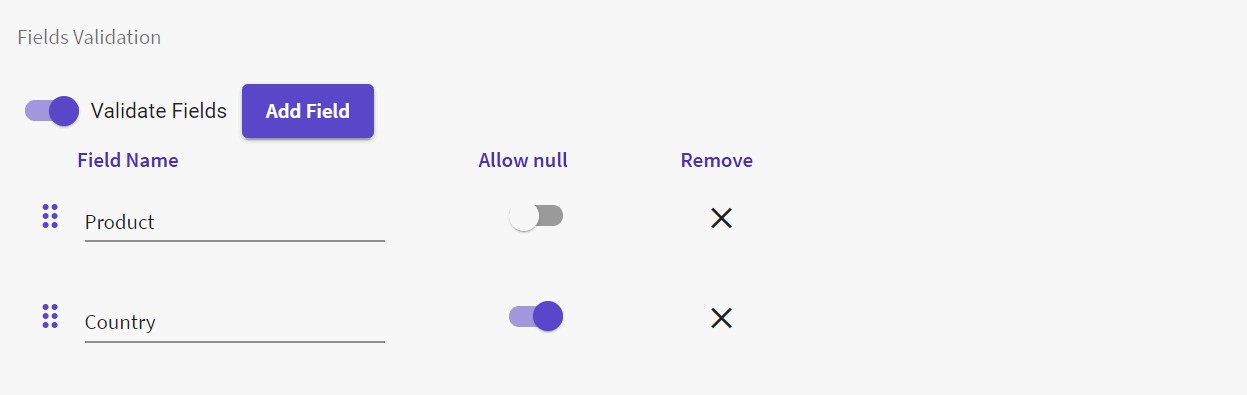
Figure 6: Field Validation
-
Slide the toggle right to enable the setting, and click on Add Field to create a new entry.
-
Add the Field Name used for updating the table.
Check: The field name must match the writeback operation field name, or you'll return an error.
-
Enable Allow Null if you want to pass null values to the table.
Vizlib Writeback Table has a default auto-lock function which is activated when a writeback operation is triggered. You can also use the Locking settings (Figure 7) to extend the locking function for the destination. If you enable Allow Locking, the destination will lock when you start to input data, and unlock the table when you have finished When locking is enabled, an icon appears in Vizlib Writeback Table.

Figure 7: Locking
-
Select Allow Locking, then choose either Lock only the current destination, or Use Lock Group. You can find out more information on lock groups here.
If you need to restrict which users can work with the destination, you can do this with Access & Security settings (Figure 8).

Figure 8: Access & Security
-
Check Secure Destination to enable secure access if you need it.
Note: This setting is configured with a security rule to allow access to the destination, so users won't be granted access automatically if Secure Destination is enabled. You can find out more about security rules in our article here.
-
You can choose to make the destination Public if you want other Content Admin users to be able to re-use it, or Private if you want to limit re-use to the creator (you), Admin and Root Admin users.
-
Enable Audit trail if you want to create an audit trail for the destination.
Note: You can access audit trails on the Writeback Audit page of the VMC, there are instructions on working with audit trails here, and you can also watch a step-by-step video tutorial on setting up an audit trail here.
-
Click Add Destination to save the destination in the VMC.
Adding Writeback Settings
Now, you need to go to Vizlib Writeback Table and configure your app to write back to the destination. You'll find these settings in the property panel under Destinations.
-
Open your Qlik Sense Hub and find the Vizlib Writeback Table sheet you'd like to work with.
-
Open the sheet in Edit mode, then go to Writeback Settings > Destinations in the property panel.
-
Click on Vizlib Server in Pick Destination (Figure 9).
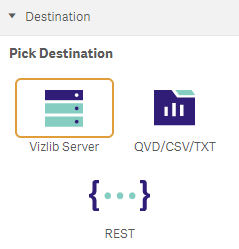
Figure 9: QVD/CSV/TXT Destination
-
Select a Writeback Destination from the drop-down (Figure 10). This is where your data will be saved.
Note: QVD/CSV/TXT destination paths follow the structure Destination|QVD/CSV/TXT
So in the example here we're writing back to a file configured for the writeback destination.
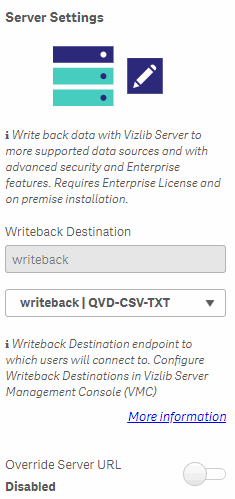
Figure 10: Server Settings
-
When you've completed the changes and saved them, you'll be able to write back to the destination you've configured.
Working with Vizlib Writeback Table - Data Load Updates
Now you've completed the setup, you will need to update your data load script to make sure data is loaded correctly back into the app. Otherwise it will look like the operation isn't completing.
The data load script is part of the Qlik Sense environment, you can find out more about editing the data load script in a Qlik Sense app here.
Note: Use * to specify all columns in the table should be loaded. This is especially useful when you expect the content of the table to change (e.g. by adding new columns).
When you complete these steps, the table will be loaded back into the app correctly and you can start to use Vizlib Writeback Table to help make the most of your analytics solution.